Around windows and doors, a proper installation does more than look good; it keeps moisture out, improves energy efficiency and protects the building long after the job is done. But not all trim work is created equal and even the best materials can fail if the installation is off. The difference between trim that lasts and trim that doesn’t often comes down to a few key steps.
Here’s what to know before you pick up the first board.
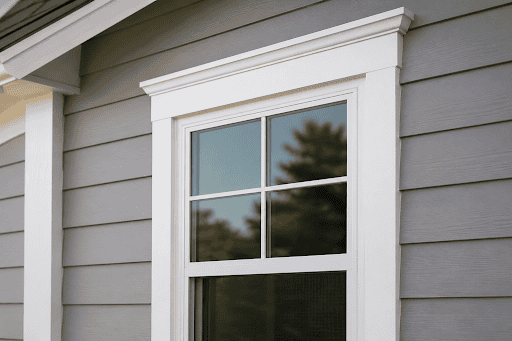
Why Proper Window and Door Trim Installation Matters
Installing trim around windows and doors may look like a finishing touch, but it actually plays a much larger role in the overall performance of a building. Proper trim installation helps protect the structure from moisture, improves energy efficiency and gives the exterior a clean, finished appearance.
When trim is installed correctly, it directs water away from openings and helps prevent long-term issues like rot, mold and air leaks. It also supports the window and door systems by sealing small gaps that naturally form during construction. However, poor trim installation can lead to expensive repairs and early deterioration of materials.
Taking the time to install trim the right way guarantees that both function and appearance are properly addressed from the start.
Common Mistakes in Window Trim Installation
Even experienced installers can run into issues when trimming windows and doors. Many of these problems come from rushing the process or overlooking small but important details.
Poor Flashing Around Windows
One of the most common mistakes is improper flashing installation. Flashing is designed to redirect water away from the window opening, but if it’s missing, damaged or incorrectly layered, moisture can easily get behind the trim. Over time, this leads to hidden water damage inside the wall.
Incorrect Trim Spacing
Spacing matters more than most builders expect. Uneven gaps between the trim boards and the window frame allow air and water infiltration, and they’re hard to ignore visually. Even quality materials can’t hide a trim line that’s off.
Unsealed End Cuts
Trim boards are often cut on-site, and those cut ends are especially vulnerable to moisture. If they’re not properly sealed or primed, water can be absorbed into the material. This is a minor step that’s often skipped but can greatly shorten the lifespan of the trim.
Preparing the Opening Before Installing Trim
Good trim installation always starts with proper preparation. Before any boards are installed, the window or door opening should be carefully inspected and ready for finishing.
Checking Window Flashing
Start by examining the flashing around the window. Make sure it’s properly layered, intact and free from damage. The flashing should guide water away from the opening without any gaps or loose edges. If anything looks incorrect, it should be corrected before moving forward.
Installing Drip Caps
Drip caps do one job, but it’s a critical one. Installed above the window, they redirect water away from the top trim and keep it from working behind the boards. Skip them and heavy rain will find its way into the structure; it’s only a matter of time.
Inspecting the Moisture Barrier
The moisture barrier behind the exterior wall plays a key role in keeping the structure dry. Before installing trim, check that the barrier is continuous and properly sealed around the window opening. Any tears or gaps should be repaired to maintain full protection.
Step-by-Step Exterior Window Trim Installation
Once the opening is properly prepared, the installation process can begin. Working step by step helps ensure accuracy and a clean final result.
Measure and Cut Trim Boards
Start by carefully measuring each side of the window. Precision is important here because even small measurement errors can cause uneven gaps or misaligned corners. After measuring, cut the trim boards to size using clean, straight cuts.
It is also important to account for expansion and contraction of the material, especially in areas with changing temperatures. Leaving a slight allowance can help prevent future warping or buckling.
Install Head and Side Trim
Begin installation with the head trim, followed by the side trim boards. The head trim should be installed first, so it overlaps the vertical pieces, helping to shed water away from the sides. This layering approach is key to proper water management.
As each piece is installed, check that it’s level and aligned with the window frame. Secure the boards firmly, but avoid overdriving fasteners, which can damage the trim or create unnecessary stress points.
Seal Joints and Corners
Once all trim pieces are in place, seal the joints and corners using a high-quality exterior sealant. This step helps close any small gaps that could allow moisture or air to enter. Pay close attention to corners and seams, as these areas are the most vulnerable.
A smooth, even bead of sealant not only improves protection but also enhances the overall appearance of the installation.
Preventing Moisture Problems Around Windows

Moisture control is one of the most important parts of exterior trim installation. Even a small oversight has the ability to do long-term damage that may not be visible right away.
To prevent moisture issues, always ensure that water is directed outward and away from the wall system. Proper flashing, drip caps and sealed joints all work together to create a layered defense against water intrusion.
Regular inspection of installed trim can also help catch early signs of wear or deterioration. Cracks in sealant, loose boards or discoloration around windows should be addressed quickly before they turn into larger problems.
Using quality materials designed for exterior use also makes a significant difference. Durable trim products, like Belco XT Trim, are more resistant to moisture, temperature changes and physical wear, helping extend the life of the installation.
What the Pros at Belco Recommend
Getting door trim sizing right starts with choosing the correct profiles for the job. For standard 3068 door installations, most builders rely on legs of 5/4 x 4 or 1 x 4 and a header of 5/4 x 6 or 1 x 6 — a combination that delivers clean, proportional results.
Pro tip: A single 18-foot board can trim out an entire door with minimal waste. If you’re using a custom header, a 14-foot board is typically ideal for the legs.
When doors already include brick molding, the sizing changes. Legs of 2 x 4 and a header of 2 x 6 align with standard brick molding depth for a flush, finished look. Some builders also prefer 2 x 3 double-sill stock in these situations for an even cleaner result.
The right stock in the right lengths makes a real difference on the jobsite: less waste, less time and a more professional finish.
Belco XT offers the sizing flexibility and profiles to cover all of these scenarios, making it a reliable option whether you’re working on a standard installation or a custom package.
Build It Right from the Start
Trim around windows and doors does more than finish a job. It protects against moisture, tightens up energy performance and sets the tone for how the whole exterior looks. When it’s installed correctly with quality materials, it’s one less thing to worry about for years down the road.
Belco’s exterior trim products are designed with these exact demands in mind, whether you’re working on a new build or a renovation. Contact Belco today and put our durable exterior trim to work on your next project.