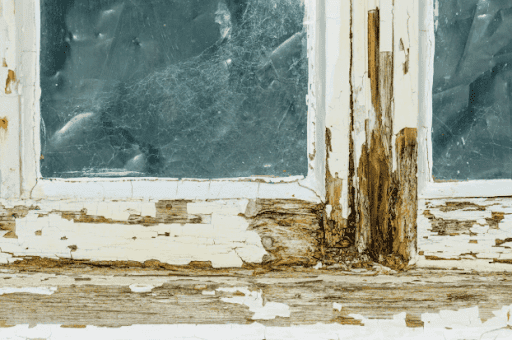
Exterior trim is one of the first things people notice about a home, and one of the first things to fail when an installation isn’t done right. Rot, warping and water damage don’t happen overnight, but they almost always trace back to decisions made during installation.
A long-lasting installation comes down to understanding how trim interacts with weather, moisture and the structure itself and making sure every step, from material selection to final sealing, is done right.
Why Exterior Trim Installation Matters for Long-Term Durability
Exterior trim does more than frame windows and doors; it acts as a protective layer that manages moisture, seals vulnerable transitions and preserves the integrity of the building envelope. When installed correctly, it prevents water intrusion, minimizes expansion and contraction issues and extends the lifespan of both the trim and the surrounding materials.
Even high-quality materials will deteriorate quickly when exposed to consistent moisture or installed without proper protection. Small oversights like unsealed joints or missing flashing can allow water to penetrate behind the trim, leading to rot, mold and costly repairs.
The Common Causes of Exterior Trim Rot
Moisture Trapped Behind Trim (Poor flashing and sealing)
One of the leading causes of rot is water getting trapped behind the trim. Without proper flashing and sealing, water can seep into gaps around windows, doors and joints. Once inside, it has limited opportunities to escape, especially if the trim is tightly installed against the wall without a drainage path.
Over time, this trapped moisture saturates the wood, leading to decay. Even small amounts of water intrusion can accumulate, particularly in areas exposed to frequent rain or humidity. Proper moisture management is essential to prevent this issue.
Improper Installation Practices (Incorrect fasteners and spacing)
Fasteners and spacing are often overlooked, but they play an essential role in durability. Using the wrong type of fastener (such as non-galvanized nails) can lead to corrosion, staining and structural weakness. Incorrect spacing can also cause the trim to warp or shift as it expands and contracts with temperature changes.
When trim is installed too tightly without allowing for natural movement, stress builds up in the material. This can create cracks or openings where water can enter. Consistent spacing and the right fastening techniques help maintain stability and reduce the risk of failure.
Using Untreated or Unprotected Wood
Wood that hasn’t been properly treated or sealed is highly vulnerable to moisture damage. Raw wood absorbs water quickly, especially at end cuts and exposed edges. Without a protective barrier, this moisture can penetrate deep into the fibers, accelerating rot.
In many cases, failure begins at these unprotected points: cut ends, joints and edges where the water exposure is highest. Choosing materials that are designed for exterior use is one of the most effective ways to prevent long-term issues.
Choosing the Right Materials for Rot-Resistant Trim

Benefits of Preservative-Treated Wood Trim
Preservative-treated wood trim offers built-in protection, so it can perform reliably in demanding exterior conditions.
- Resists decay, insects and moisture-related damage
- Withstands constant weather exposure without breaking down
- Maintains structural integrity over time
- Stays straighter and more stable than untreated wood
- Penetrates deep into wood fibers for long-lasting protection
- Guards against premature rot when properly installed
Primed Trim vs Raw Wood
Primed trim offers an added layer of protection right from the start. Factory-applied primer helps seal the surface, reducing moisture absorption and providing a better base for paint. This saves time on-site and ensures more consistent coverage.
Raw wood, while sometimes preferred for customization, requires immediate sealing and finishing to perform well outdoors. Any delay in priming or painting can leave the material exposed to moisture, increasing the risk of damage.
For long-term performance, primed trim is often the more practical choice, especially in environments where weather conditions can change quickly.
Texture and Finish Options for Exterior Trim
Texture and finish are not just aesthetic considerations; they also impact how the trim handles moisture and paint adhesion. Smooth finishes provide a clean, modern look and are easier to paint, while textured finishes can help hide minor imperfections and add visual depth.
Some finishes are designed to improve coating adhesion, allowing paint to bond more effectively and last longer. Selecting the right texture can enhance both the appearance and durability of the installation.
Step-by-Step Exterior Trim Installation Best Practices
Preparing the Wall Surface
Before installing trim, the wall surface must be clean, dry and properly prepared. This includes ensuring that the sheathing, house wrap and any existing barriers are intact and correctly installed.
Any damaged or uneven areas should be addressed before proceeding. A solid, well-prepared surface provides a stable foundation and reduces the likelihood of gaps or misalignment during installation.

Installing Flashing and Moisture Barriers
Flashing is vital for directing water away from vulnerable points. It should be installed above windows, doors and horizontal trim elements to create a path for water to drain safely.
Moisture barriers, such as house wrap or building paper, should be properly lapped and sealed to prevent water from reaching the underlying structure. These layers work together to create a continuous defense against moisture intrusion.
Skipping or improperly installing flashing is one of the most common reasons exterior trim fails prematurely.
Proper Fastening and Spacing
Use corrosion-resistant fasteners that are suitable for exterior use. Stainless steel or hot-dipped galvanized nails are typically recommended, as they resist rust and maintain their strength over time.
Fasteners should be placed at consistent intervals, following manufacturer guidelines. This ensures even support and allows the trim to expand and contract without stress.
Avoid overdriving nails, as this can damage the surface and create points where moisture can enter. Proper fastening techniques contribute to both the appearance and durability of the installation.
Sealing Joints and End Cuts
All joints, seams and end cuts should be sealed to prevent water infiltration. High-quality exterior-grade caulking is essential for closing gaps and maintaining a watertight seal.
End cuts are particularly vulnerable, as they expose the inner wood fibers. Applying a sealant or primer to these areas before installation helps protect against moisture absorption.
Taking the time to seal these properly can significantly improve the overall lifespan of the trim.

Maintenance Tips to Extend the Life of Exterior Trim
Regular maintenance ensures that exterior trim stays protected and continues to perform well over time.
- Inspect periodically for early signs of wear, such as cracked caulking, peeling paint or small gaps
- Repaint or reseal as needed to maintain a strong protective barrier
- Keep gutters and downspouts clear to minimize water exposure to trim
- Clean surfaces regularly to remove dirt, mold and mildew that can trap moisture
- Address minor issues promptly to prevent more extensive and costly repairs
Get Your Exterior Trim Installation Right the First Time
A successful exterior trim installation depends on quality materials, proper technique and attention to detail. From selecting preservative-treated wood to sealing every joint and installing effective moisture barriers, each step plays a important role in keeping rot out and performance in.
When done right, exterior trim doesn’t just survive the elements, it holds its appearance and structural integrity well beyond the 10-year mark. The right approach upfront means fewer repairs, lower long-term costs and results you won’t have to second-guess.
Ready to build trim that’s made to last? Explore Belco Forest Products’ exterior trim solutions, engineered for high performance and built to handle whatever the elements bring. Contact Belco today and let’s get your project started with materials you can count on.
Frequently Asked Questions (FAQ)
Q: How long should properly installed exterior trim last?
A: When exterior trim is installed with the right materials and proper moisture management, it can perform well beyond the 10-year mark. Early failure is typically tied to issues like poor sealing, missing flashing or unprotected wood.
Q: What is the best material for rot-resistant exterior trim?
A: Preservative-treated wood trim is one of the most reliable options for exterior applications. It offers built-in resistance to moisture, decay and insects while maintaining its strength and stability over time.
Q: Do I need to seal cut ends of trim boards?
A: Yes. Cut ends are especially vulnerable because they expose the inner wood fibers. Sealing or priming these areas before installation helps limit moisture absorption and reduces the risk of rot.
Q: How important is flashing in trim installation?
A: Flashing plays a critical role in managing water. It helps direct moisture away from areas like windows, doors and horizontal trim, preventing it from getting trapped behind the material and causing long-term damage.